
This article may be useful for those who are new to Zendesk® Support and want to quickly get acquainted with its general concepts. Here we explain how you can easily work with Zendesk® Support. We added some photos on the way for you to better understand the information. There are also several tasks and lessons, which may be useful for understanding the idea. We recommend to begin with a trial for your getting started with Zendesk®, so you will be able to do your own version of Support. TEST TEST TEST
Tickets Overview
There is no matter what customer support type you provide as long as customers need your help to solve their problems. They can reach you by an email letter, a request of support form in Zendesk® Support portal, a request of support form on the web site of your company, a phone call, a text chat, a tweet, a post on Facebook.
These options are also called channels. You can choose whether options to offer to your customers in case they want to reach you. You are able to open more ways of communicating, adding Apps to your Zendesk®. They enable you to reach more well-known products and services on the Internet.
All customers’ requests from every channel become Zendesk® Support tickets. They contain initial help requests from customers and conversations with your agents during the solving of the issue.
Favorite customers’ channel is live text chat. A customer can create a new support request and start a new chat session or chat in the already existing unsolved tickets. This ticket captures the whole conversation between the agent and the customer in your Zendesk® Support.
Creating a Ticket
Having already created your trial account, you can make a test ticket and see what it typically looks like.
1. You can easily create a new ticket by sending an email to your Zendesk® account. Be sure you are using another email account from the one you used to set up your Zendesk® Support trial. You just need to address your letter to [email protected]. The ticket will be immediately created.
2. The next step is to log in to your Zendesk® account and then to click the Views icon on the left.
3. The new ticket will be in the Unassigned tickets view.
4. Finally, to open the ticket, click on its title.
Roles of Ticket Users
A Requester is a person who initiated the support request.
An Assignee is an agent who is assigned to this very ticket.
A Submitter is also an agent, in case one opens a ticket for a customer.
What a Ticket consists of

When you open your new ticket, you will see that the first comment on that ticket is the support request created earlier. To enter a response you(as an agent) will have a new empty comment open above. A comment you write in this space as a Public reply will be visible for everyone who views the ticket, including the requester.
It is possible to write private comments (also known as Internal Notes). In this case, a person who requested support does not see these notes as they are used only for internal communications. This happens when one agent may need advice from other agents to solve the requester’s problem. To add an internal note, click that tab.
You can find the date and time the ticket was created and where it is originated from below the title of the request. You can see the ticket fields on the left of the ticket. Now we are concerned only with the Assignee field (the others will be explained further).
To solve and close a ticket, it needs an agent to whom it is assigned. If you just started using your trial account, you could assign the ticket only to yourself, as you are the only user in your Zendesk® Support instance.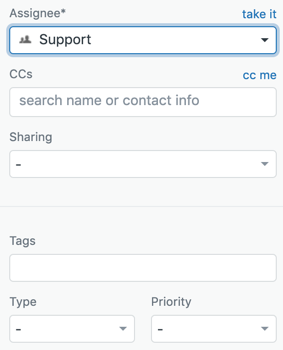
How to Assign a Ticket:
1. Open a ticket, click the down arrow next to the Assignee field and select your name.
2. There are also Type and Priority fields and each has several options. In this case, set Type to Problem and Priority to Normal.
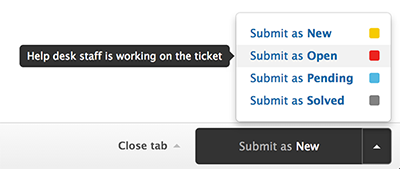
3. Click the down arrow next to the Submit tab on the bottom right of the page to save the changes. The ticket status will be automatically changed to Open when you assign it to an agent.
After assigning a ticket to an agent, they can start working with customer’s issue. Some tickets may be solved with a simple response and others may require advice from other agents, researching or getting some extra information from the customer.
Ticket Solving Stages
1. Each ticket goes through several stages until it is solved. Next, are the typical stages:
2. As we already mentioned, when a request first arrives it becomes a ticket and sets to New.
3. When an agent is assigned to the ticket, it sets to Open.
4. The agent can set the ticket to Pending if they require more information from the customer and have asked the customer for more information.
5. When the problem is solved, the agent will set the ticket to Solved.
6. After a number of days, the ticket automatically closes and becomes archived in case of further reference.
7. Agents can not set the ticket to Closed on purpose and you can not see it as an option in the list under the Submit button.
8. The final stage is knowing your customer is satisfied with the support the agent provided. For this purpose, there is a brief customer satisfaction survey which is sent after the ticket is solved. There is one question with 2 possible answers. In this way, it is a very quick and effective way to receive feedback on the provided support.
In case the customer is not happy with the result after resolving their issue, they can respond back to the agent by replying the email “ticket solved”. Then it is the agent’s job to go through the ticket life cycle again until the customer is satisfied.
Tickets and Users Organization
For tickets organization there are views. They are essential throughout the ticket life cycle as they enable to group tickets meaningfully. There are pre-defined, editable views from Zendesk® Support for everyday use. The best practices for customer services served to be the base of forming these views.
To see the view list, click the Views icon in the sidebar. Each Zendesk® account gets these views to help you get started. But you also can create your own new views or modify already existing.
Some tickets may appear in a number of views with their organization depending on their properties. This happens because tickets can match all criteria according to which they were sorted out.
Types of views
Zendesk® provides you with Shared views for which all agents have access. If the admin creates or modifies views for a certain group of agents (not every agent can see it), they are restricted views. Agents are able to create views to which only they have access. They are called personal views.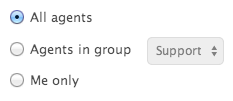
How to Create a View:
1. Click the Views icon in the sidebar.
2. To open the Views administration page, click More at the bottom of the list of views.
3. Click Add View.
4. Enter any title for your new view.
5. To define what tickets to display in the view, use conditions. For example, you want to create a view with the tickets assigned only to you. Click the drop-down list below the label Meet all of the following conditions. Then select Ticket: Assignee. Then will appear two more drop-down lists. The first will be set to Is. Now click the next list and select (current user) or your name from the agents. That’s how you define conditions.
6. To see the results of the defined condition, click the Preview match for the conditions above button.
7. You can also define the formatting of the view and who has access to it. For now, you can scroll down and select Me only under Available for.
8. Click Create view to create your first personal view.
Agent Organization

Agents may belong to more than one group, so when you will assign a ticket to an agent, it will be assigned to a group. You can also assign a ticket to a certain group, not to just one agent. After that, the group will be able to assign this ticket to any agent within their group.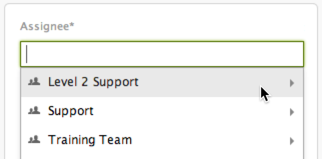
Agents can be grouped for any reason, but usually, they are organized by specialty, expertise, location, or language.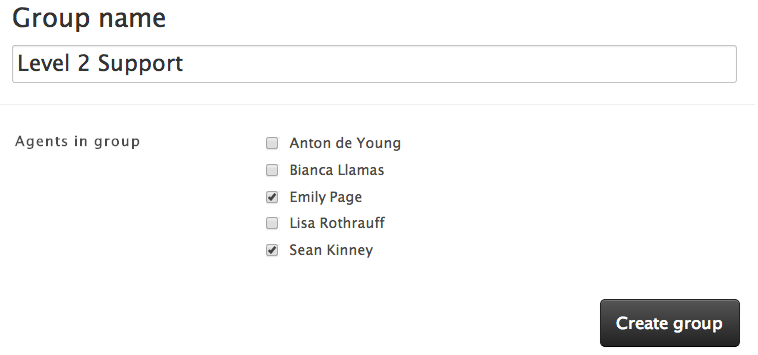
Of course, it is up to you how to organize your own views and tickets. If you have a few agents you may just create one view, from which they can pick up tickets to work on. But if you have a larger team, it will be better to create more views for every group to support the workflow.
In Zendesk® Support there is a default group, where the system automatically adds you and your agents. This group is called Support and it is there should be a group to assign and resolve tickets. It is possible to create new groups and add or remove agents from any group in Zendesk® Support.
How to Create a Group:
1. Click the Admin icon in the sidebar and then choose People.
2. Click Add Group in the upper part of the People administration page.
3. Type a name for a new group.
4. Select your name among the list of Zendesk® Support agents below the title.
5. Finally, click Create group to create your group.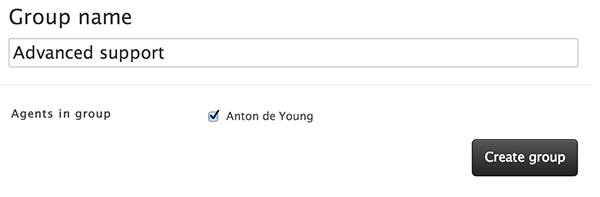
Customer Organization
Providing different types of support will be very useful for organizing your workflow. That is why you can add customers to one or more organizations and then have another type of support for each one.
Every ticket a user creates is associated with the default organization they belong to. This can be used to automate the handling of the incoming tickets.
The use of organization can help you to sort out tickets according to company names, email domain, location or language. You can also use organizations to control access to Zendesk® Support tickets. If you allow the other users in the organization to see all the tickets referring to the whole organization, you can avoid creating additional tickets. For example, an essential application is unavailable to the organization and everyone creates a ticket with the support requirement. If they have visibility into Zendesk® support issues and you will prevent yourself from getting similar tickets.
You may also add customers to organizations and thus restrict agent’s access only to a certain organization (you can do in the same way with agents and groups). Tickets can be assigned to a specific group from an organization.
Tags for Users and Organizations
To help you organize the Zendesk® Support workflow, you can add tags (additional information) to profiles, including users and organizations. They will help to automatically track and assign tickets. If you create a certain tag for a specific user or organization, every ticket connected to these users will be reformed with this information. Then, for example, you can use this tag to create a new view that will contain tickets with this unique tag.
How to create an organization:
1. Find the test support ticket you just created in the view you created or in the All unsolved tickets view.
2. Click the Organization tab, to create an organization. The tab mat show Organization (create) as the user does not already belong to any organization.
3. Now you can type the name of your new organization in the empty space next to Name.
4. If you want to segment specific companies into organizations, you can additionally add one or several email domains that will automatically add users with the same domain to the organization.
5. Click Save to create the organization and automatically add user’s profile assigned to this ticket.
Roles of Users
You are already acquainted with agents and customers, which are two main roles of users in Zendesk® Support. Although, there are other roles you should know about.
First of all, the term customer is interchangeable with the term end-user. They both mean people who use Zendesk® Support to request help. You can see these two terms in the Zendesk® Support interface, documentation, and training.
What about Zendesk® Support staff roles, you already know about agents, who fix customer’s issues. But you can assign specific tasks to certain agents to cope with different part of your Zendesk® Support workflow.
There is also an administrator role, except for agents. There is a possibility to have multiple administrators in one Zendesk® account. They will help you to set up with the channels to support, manage users. Create new views and so on.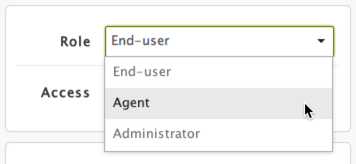
The account owner is someone who created the Zendesk® Support account and is able to every action referring to this account.
Roles of custom agents
The Enterprise version of Zendesk® Support allows you to create a custom agent and several administrative roles. This means that you create a role specifically made to run your work process with a certain list of permissions.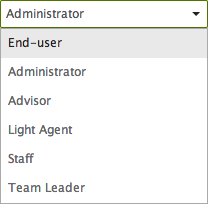
How to add a new agent and assign to a group and organization
1. Firstly, to create a new agent you should use the other email address from one that you used to create your Zendesk® account.
2. Put your mouse over the tab Add in the top toolbar and click on User.
3. Put down the name and the email address of your new agent.
4. Select Agent in the User Role drop-down list, click Save. When displaying the new profile, you can add the agent to groups, define their access to tickets and other parts of your Zendesk® account or add any other information to this profile.
5. Click Groups to add the agents to another group. You may use the group you tried to create earlier.
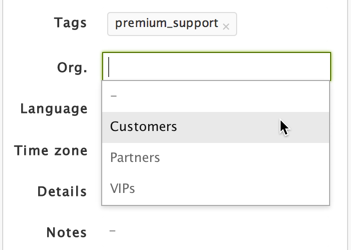
6. To change the agent’s access permissions, click the Access field and choose Tickets in agent’s org.
7. Now click Org. field and select the organization you just created to complete the access restriction.
Solving Tickets
While solving a ticket and agent may face with informing the customer about receiving their request, solving the problem alone or with the help of another agent, reviewing the history of the ticket and solving repeating problems.
The unsolved ticket should look like this, when ready for your response: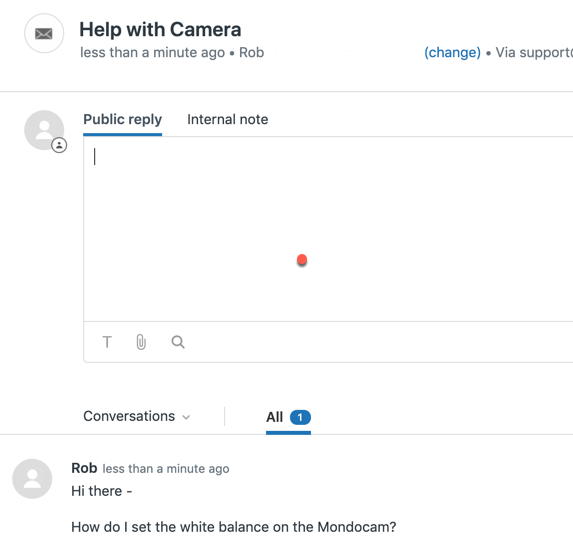
The ways of assigning tickets to the agents
Agents can be assigned the tickets manually or automatically. You can assign a ticket to any agent, allow agents to assign tickets themselves or set up tickets to be automatically assigned to a certain group or agent by Zendesk® Support.
It is convenient to set up a combination of manual and automatical assigning of tickets. For example, use managers to assign tickets and delegate management of the tickets queue to a support lead.
Update notifications of tickets
In Zendesk® Support we already took care of replying to the customers when you received their request. The system can automatically send email notifications after certain types of ticket updates. The link to the ticket that was created after the customer's request is automatically added to the email notification so the customer can update the stage of the ticket update.
Many Zendesk® customers only communicate with their customers via email to avoid the link being sent back to the ticket. You can do the same thing and even customize the visual design that will match your brand.
Triggers
A trigger is one or more action connected to the ticket, which was performed immediately after the ticket was created. An example can be an email received after the request. In this case, it worked because the ticket was created.
In Zendesk® there are pre-defined triggers, which you can modify or define your own.
Type and priority of a ticket
You already know about the ticket life cycle and how it changes. It is essential to know on what stage the ticket is now for the solving. There are two more optional ticket properties that can help you to monitor how urgently a ticket needs to be solved.
There are four pre-defined ticket types on Zendesk® Support: Question, Problem, Incident, and Task. The ticket’s type is selected manually by the agent5 it is assigned to.
Question indicates that the customer's request is more similar to be a question that the problem that needs to be solved.
Problem indicates that there is an issue connected with your product or service that may appear with other customers too.
Incident means that the size of a problem concerns more than one user. This type of ticket is connected with the Problem ticket and becomes automatically solved when the Problem ticket is solved.
Task assigns a specific ticket to a certain agent and requires the Task Due Date.
To help the agents remember to resolve the tickets in time there is a ticket’s priority. It is available to change it when you establish your own rules in your Zendesk® Support account.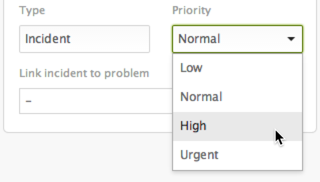
The are four types of priority: Low, Normal, High and Urgent. It is up to you how to define tickets’ priority, depending on the customer who sent a request or amount of time that passed since the ticket creation.
To avoid the handling of each ticket individually, when the problem concerns the large company requests are coming from every user from that company you can do next. Just create a general ticket that summarizes this problem, then link all the rest of individual requests to that problem ticket. The incident tickets will be automatically set to Solved when you resolve the problem ticket.
Responses to Recurring Questions
Sometimes you can receive recurring questions that you just need a standard reply to. You can use macros to deal with this type of recurring requests.
Macros are simple responses to frequently sent requests and they are pre-defined. You can create macros like views that all agents can use (global macros) or create ones that only agents in a specific group can use (restricted) or create personal macros.
You can create macros from scratch or save them from one of your responses.
To deal with recurring questions you can simply form your own knowledge base, where customers can find answers to frequently asked questions themselves.
Personalization of macros
Customers like to feel that you are speaking to them directly rather than receive and automatical response, so it’s better to personalize your macros. You can do this by adding placeholders that will include personal customer data. This data can be added later to your responses to customers that can help to prevent sending generic messages.
How to Create and Apply a Macro
1. Click the Admin icon in the sidebar and select Macros.
2. Select the Shared tab.
3. Click Add macro. For example, we can create a macro that asks a customer for more information.
4. Type a title.
5. Macros can update the ticket status and create notifications for customers. Click Action drop-down list and choose Ticket: Status, then Pending.
Click the plus sign to add a new action and create a notification. Select Ticket: Comment/description. An empty text box will appear. Write a message you want to send your customers in case you need more information from the customer.
6. To specify who can use this macro, select Available for all agents (or other).
7. Click Create Macro.
Macros can be added to tickets. To do this, go to the chosen ticket and in the bottom of the ticket window click Apply Macro. Now select the macro from the list and the ticket will be updated with the actions that macro contains. To save the changes click Submit.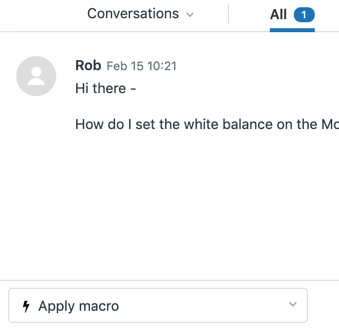
Ticket History Review
There is a ticket conversation which is basically many messages from agent and customer back and forth. During that, macros and triggers will update the ticket and define its properties.
Tickets contain not only properties and comments but also events and notification history. Above the ticket's first comment you can find the Conversations drop-down list that is used to choose what is displayed in the ticket body.
Conversations display communication between agents and customers, or agents and agents.
Events display replies, changes, status, and other, connected to the ticket which were applied by an agent or a rule.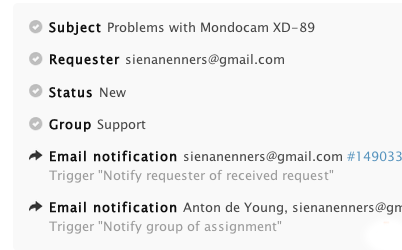
Users and Tickets Merging
If you allow your users to self-register in your Zendesk®, they may create more than one account or create more then one support request for the same issue. To handle these situations, there is a merging of user’s duplicate accounts and multiple support requests for the same issue in Zendesk®.
Ticket's event history includes merge actions.
Ticket Sharing
More than one agent can take part in solving the ticket as they may collaborate with other people that might have the information that one needs to solve the issue. In this case, agents can add public and private comments to the ticket and end-users can only add public comments.
The same way, you may collaborate with other companies and networks, which are a separate instance of Zendesk® Support, so you can receive their help in resolving tickets. This is what Zendesk® calls ticket sharing. This action allows agents from other Zendesk® Support instances provide you with information that can help in solving the issue or resolve the issue themselves.
There is also an ability to automatically share tickets with other Zendesk® Support instances when they contain a special tag and the trigger does the action. You always can manually share tickets, but only one at a time.
Ticket Comments Formatting
You can add text formatting as bucket lists or headings and thus enable Rich content or put down a simple text markup which name is Markdown. Now you will be able to use formatting toolbar and chose what formatting options your agents will use.
Business Rules
Now the time has come to talk about automated business rules, which mean pre-defined actions that automatically apply to tickets. There are two of them: triggers and automations. They contain a set of actions that occur only if a ticket matches specific conditions or in other words when specific events occur. The difference between triggers and automations lies only in kind of events that cause the modification of tickets. Automations start to act based on the event time and triggers actions when the ticket is created or updated.
Only administrators can create triggers or automations because business rules may affect every ticket and it’s only the administrator’s work to define custom triggers and automations in order to support the workflow.
Conditions and Actions
Conditions are references to ticket and user fields with the data connected to these fields. There are all conditions and any conditions. In the case of all conditions, all of them must be true, another way the automation or trigger will not act.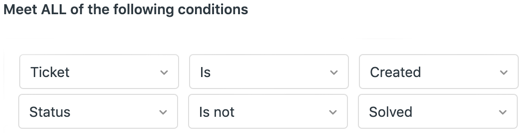
Also, at least one of the any conditions must be true to trigger or automation to act on the ticket.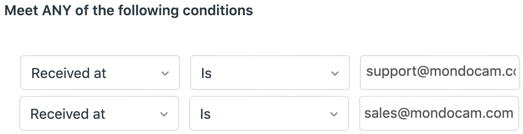
Actions follow the same formula, but they only set ticket properties of sending emails instead of checking if they are true or not.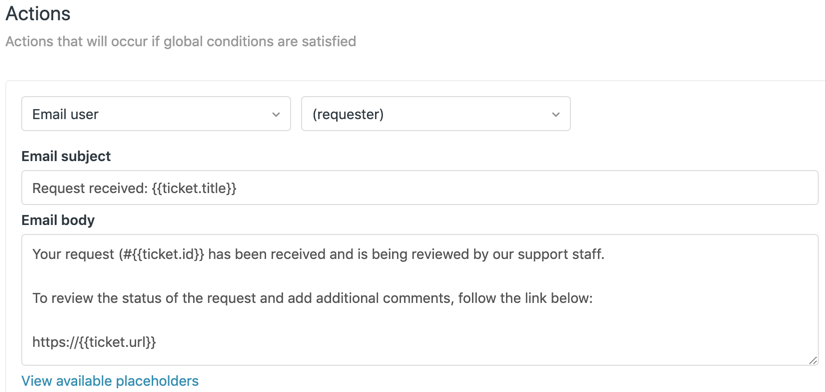
Conditions
To build condition statements, you can use the operator that highlights the value to exclude from a condition. There are several operators in the Zendesk® Support: Is not, Less than, Greater than, Changed to, Changed from and so on.
Support Notification Triggers
To check the pre-defined triggers with which comes your Zendesk® Support instance, select the Triggers page in the Zendesk® administrator view. The same way as macros, you can use placeholders in triggers and automations to insert the personal data of a user into ticket replies or email notification.
If you would like to create a trigger, you need to:
1. Click the Admin icon in the sidebar and select Triggers.
2. Click Add Trigger.
3. Write down the title.
4. Add the condition Ticket: Status, select Less than as the operator and then Solved.
5. Add another condition clicking the + button and enter the tag.
6. Now assign the tickets with the chosen tag to the group you created earlier.
7. If you want to choose the tickets priority, choose it in the Ticket: Priority.
8. To save the trigger, select Submit.
Automations
Automations are based on time events, that is why they must contain additional conditions to allow you to make updates after a certain amount of time.
One of the pre-defined automations in Zendesk® Support is Close tickets 4 days after status is set to solved. You can also review it by and choose the settings to as many days as you want, up to 28 days.
The common uses of automations are notifying a tickets remains unassigned, unresolved, undated, increasing ticket’s priority or closing the ticket after a certain amount of time.
Test your business rules
You can create a test version of your Zendesk® that you can use to test new automation or trigger without affecting the actual tickets, but only in Zendesk® Support Plus and Enterprise. Simply, it is a sandbox.
Let’s try to build an automation that will alert the assigned group or agent that the ticket hasn’t been handled for a certain amount of time.
1. Click the Admin icon in the sidebar and select Automations.
2. Click Add Automation.
3. Type the title.
4. Add the Ticket: Status condition. Select Less than as an operator and then click Solved.
5. Add other conditions with clicking + button and selecting Ticket: Hours since created and Ticket: Tags.
6. Now add the actions Ticket: Priority = Urgent and Notifications: Email user = (assignee).
7. To save the automation click Submit.
Now, you are aware of the Zendesk® Support work, functions and abilities. After this overview, you will be able to create and control your Zendesk® Support instance in the way that is comfortable for you and effective for your workflow. If you are ready to set up your Zendesk® account you may also read our other articles that are more detailed about the areas we covered to make this journey easier and more understandable for you. If this article was useful for you, make sure to share it with your friends and colleagues, so we know it.
Planning a Zendesk® Migration?
Use an automated, secure, and fast service.